Monday, September 19, 2011

Fall Wedding Cakes

What is better than a wedding cake?  Two wedding cakes!

A few months ago, my husbands Aunt asked if I'd make her a wedding cake, she wanted a chocolate cake with chocolate ganache frosting and fall leaves and flowers down the side of the cake.  I came up with an idea and sent it to her.  She responded with, "can you make two cakes?"  One of them as we had already discussed and one similar only carrot cake with cream cheese frosting.  My plan was to get started on the gumpaste flowers weeks in advance, but time got away from me.  The week before the event, the scramble began.  So, my intent was to take pictures of all of the flowers in stages...
 
 But that is as far as I got. :)  As I get working on a time crunch I forget to stop to click the camera.  Oh well.  This is the beginning of the roses that I made.  I placed them all on wires (new for me), not sure it helped me tremendously in arranging them, but it was nice to try something new. 
 I made a double batch of chocolate ganache and cream cheese frosting.  I've never made chocolate ganache before. It was surprisingly easy and I loved how smoothly it went on the cake.  I'll definitely use it again.
 I spent an entire day baking 6 cakes (2 8" and 4 12" to be stacked).
 I frosted them separately and then stacked them.  There is filling inside the cakes as well.
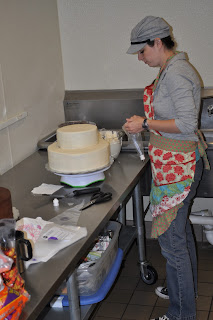
 We drove an hour and a half to the site of the reception with the cakes frosted and stack.  The flowers were all ready to go as well.  I wanted to put it all together there so that I didn't have to worry about anything shifting on the long car ride.  In the picture above, I'm adding the shell border around the base of each cake.
 Above is a lot of the flowers and leaves that again were made ahead of time.  I tried modeling chocolate for the first time - hoping to make the leaves out of it.  It was very easy to make, but it was far to soft when we tried making the leaves.  At 10:00 the night before we decided not to mess with it and to use the gumpaste instead.  I have a lot of the modeling chocolate left over, so I think I might mess around with it a bit now to see what I can do with it without a time line.

Below, are the finished products.  I was very pleased with the finished product.  Which I don't say too often.  I spent over 40 hours on these two cakes.  Incredible amount of time, but I learned a lot and enjoyed my time (for the most part). 


Sunday, September 18, 2011

65

Just when I think I've got it all figured out, God humbles me.  For a gentleman's 65th birthday I was asked to make some cookies (to hang from a tree) and mini cupcakes.  I found the cutest cookies to inspire me and I decided to create the cupcakes to match.  I was given the colors orange and teal to match the birthday color theme.  I started by creating royal icing 65's, larger ones for the cookies and smaller ones for the cupcakes.  I made far more than I would need as I knew there would be some breakage.
 They did not dry!  I'm not sure what happened.  I've never had difficulty with royal icing.  So, with less time to allow them to dry I had to come up with a different idea.  Idea number two, the newly developed plan B was chocolate.  Through a crazy combination of orange, red, and brown we created the right color of orange and my husband was tasked to created the 65's for the cupcakes while I worked on the ones for the cupcakes.  We were crunched a bit for time (wasn't expecting to be making all of the numbers again).
 Cupcakes were frosted, and sprinkled and each received a chocolate 65.

I love baking/decorating sugar cookies!  I used a really thin royal icing to flood each cookie and placed a chocolate 65 on each while the icing was still wet.  After the icing dried and added the white.  I used a sheer white ribbon to thread through each of the holes so that they could be hung at the site of the party. 
While this project took longer than I expected, they turned out really well.  Super cute and really delicious (don't worry, there were extras that I was able to sample).

Friday, September 9, 2011

Cinderella Cake


My mom used to make princess cakes for my sisters and I when we were growing up.  That is right, cake decorating runs in my family :).  I promised myself that I would never make one.  Not because I didn't appreciate what my mom had done for us, but rather it seemed so cut and dry.  However, I thought it would be fun to do something a little cut and dry.  I didn't have to do the math and really think about this one.  Simply, bake a few cakes and cover it in fondant right?  Well, not necessarily like that, but I was looking forward to it.  My friend's daughter was about to turn three and she LOVES princesses.  So I begged my friend to let me do a princess cake for her.  She provided the Cinderella Barbie and I got to work.

I baked a wonder pan cake and an 8 x 3" round cake.  Stacked, filled and carved for a smooth edge and crumb coated.  Here is where the frustration began.  I wanted Cinderellas dress to frill up so I could put some little white ruffles on the dress to give it some dimension.  I placed some rice crispy treats on the cake to give it some flow - but I hated that part in my end product.  Next time, I will cut some shape into the cake rather than adding to it.  Or maybe a little of both, but I was not happy with the way that part turned out.  Anyway, I didn't get any pictures because of my frustration, but believe me, the cake got covered in fondant.

I stripped Cinderella and covered her in plastic wrap (yes, including her head - I didn't want to get  frosting her her hair).  I put the bodice and sleeves on her dress.  I tried and tried and tried to get some white gloves on her, but it would not work - they kept looking more like giant mittens.
I added Cinderella to her dress.  Added some accents, like the light blue by her waist and the ruffles that I so desperately wanted to add.  And she was finished.  Really not that challenging, but you could really do some neat things with these modern day princess cakes.  I've seen some great (and not so great) youtube videos on it.   The most important thing is that the birthday girl LOVED it!

Tuesday, September 6, 2011

Birdhouse Cake

This cake was for the same 90 year old man as the crossword cake - for the same day!  That was a lot of cake to get together in a short time.  I was given a birdhouse that the man had made, and I was to create an edible replica.

This cake was very similar in structure to the Barn Cake.  Ahead of time I made the "logs" and roof out of a fondant/gumpaste mixture.  I had colored them a light tan.  I also made the base and the birds ahead of time.  For the base I had a few pieces of cardboard glued together with a few extra pieces on each end.  I covered the entirety in fondant/gumpaste and added the lines and texture.  For the birds, I created a head/body out of rice crispy treats and covered that in fondant/gumpaste.  I started with the same tan as I did for the "wood".  When they had dried a bit, I painted with gel food coloring and lemon extract. 

I used 2 9x13 cakes that I had cut into two pieces each (not right down the middle, but rather to get my desired size for the bottom portion of the cake).  The smaller pieces that were left were used to form the roof.  This was a chocolate cake with almond frosting. 

Once the cake was stacked correctly, I began stacking the logs around the exterior.  I used a combination of royal icing and edible glue to hold them together in place.  I placed the roof and front and back top pieces on.  I cut out some black squares for windows which were painted with some piping gel to give them a glossy look.  I cut a few more pieces of the wood toned fondant/gumpaste to place around each window.  Then I cam back and painted the entire cake with brown food coloring and lemon extract.  I liked how the food coloring sat in the deep grooves to help the texture stand out.

Final touches, I added the birds and a screw to the front of the house (just like the original house).