
Friday, July 29, 2011
Snowflake Cupcakes
It may be hard to imagine during the beautiful MN summer, but over half of our year is filled with snow. Almost 6 months ago, I made these cupcakes for my husband to bring to a potluck at work. And for another snow inspired cake, stay tuned for my next post.
 Red velvet cupcake with vanilla frosting. I colored half of the frosting a light blue. I placed a mix of the two colors in my piping bag with the 1M tip. I sprinkled each with white cake sparkles and white nonpareils. The snowflakes were made ahead of time using melted white chocolate in decorating squeeze bottles (you can use piping bags, but I prefer the stop and go of the bottles). I placed a few snowflake templates under a piece of wax paper. I sprinkled some of the snowflakes with white cakes sprinkles as well. Very simple to place on the cupcake and send them out the door.
Thursday, July 28, 2011
Cowboy Cake
My oldest sister asked me to make a cake for her son for his birthday. Naturally, I asked my nephew what he wanted for his 5th birthday cake. He responded, "I would like a cowboy on a horse." Okay! Wheels started turning, I started searching the web for what was out there. This was not going to be a huge gathering, the cake did not have to be huge. We were actually going to be celebrating his birthday along with Thanksgiving, so people were not going to be eating a ton of cake. The cake would also need to be gluten free, due to some family allergies, which is a little trickier to work with. Challenge accepted!
 I used a coloring book page to create the cowboy out of fondant about a week ahead of time. I cut out templates for each color on wax paper and used that to create the horse and cowboy. I came back and added details with an edible marker. I tried to use some layering to make him a little more dimensional. There is a solid white layer of white fondant behind the entire piece to glue (edible) all of the pieces to. There are a pair of lollipop sticks sandwiched between the white and brown to hold the horse upright into the cake.

 Four layers of gluten free chocolate cake with raspberry buttercream. I covered it in blue fondant. I then covered the top with green royal icing. I could have used buttercream here, but was hoping that the royal icing would help hold the horse into place. It worked perfectly. I piped a paisley pattern around the blue using the pattern above as a guide. In order to keep consistency throughout the pattern, I used a strip of parchment that went around the entirety of the cake and folded it into repeating sections. I drew the main portions of the design around it and used a pin to mark the cake. I then came back with royal icing and piped over my pin tracks.
The sherrif star was made with yellow fondant (using cookie cutters -star and 5 small circles) and painted with lemon extract/gold luster dust). The "5" and "Sawyer" were piped with royal icing.


The sherrif star was made with yellow fondant (using cookie cutters -star and 5 small circles) and painted with lemon extract/gold luster dust). The "5" and "Sawyer" were piped with royal icing.

Me along with the birthday boy himself!

He was most excited to eat the cowboy and horse.

It was delicious!
Wednesday, July 27, 2011
Thanksgiving Turkey Cupcakes

These weren't as easy or quick to make as the cherry pie cupcakes, but I thought they were worth the effort, and so did everyone at our gathering.
Tuesday, July 26, 2011
My Baby turned 2!
I realized that this would most likely be the last year I get to choose the theme for Grace's Birthday Cake. At 3, she'll be old enough to tell me what she wants. In fact, she has already informed me that she would like a Thomas the Train cake as one of her friends recently had one. We'll see if she changes her mind before November. I wanted something girly, but not over the top. She loves to play tea party, so I decided on a tea pot cake. With two cups to go with, one for each candle.
 A few days prior to the event, I made the handle and spout for my tea pot and the handles for my two tea cups. They were made out of a fondant/gumpaste mix. The spout was really heavy and I ended up hollowing it out so that it wouldn't pull the whole cake down. In the chance that I ever make one again, I will try to remember to make it out of rice crispy treats covered in fondant. I reserved some pink fondant for the top and bottom.
I baked the white cake for the cups in some Pamerpered Chef 1 cup prep bowls. The tea pot was baked in the Wilton Sports Ball Pan Set. I filled and crumb coated in raspberry buttercream. I covered each with white fondant. I then placed my pre-made parts on the cakes. I used a bit of white royal icing at the joints to help hold each piece tight against the cake and to make it appear continuous.
 On to my favorite part. I've told you that I love brush embroidery. The flowers were made with two tones of pink royal icing, dark pink piped outside a lighter on the inside. This gave each petal a gradient look. I wish I would have done the same for the leaves in retrospect.
 I painted some flowers on the cups too. Then I placed a little chocolate buttercream in each cup and some dripping out of the spout. Though you can't see it, there is also a drip on the tray. I also placed a few sugar cubes on the tray. Speaking of the tray, my grandmother made this one. Absolutely perfect for displaying this cake.


I baked the white cake for the cups in some Pamerpered Chef 1 cup prep bowls. The tea pot was baked in the Wilton Sports Ball Pan Set. I filled and crumb coated in raspberry buttercream. I covered each with white fondant. I then placed my pre-made parts on the cakes. I used a bit of white royal icing at the joints to help hold each piece tight against the cake and to make it appear continuous.


Grace was able to eat one of the cups all by herself, and she LOVED it!

Monday, July 25, 2011
Cherry Pie Cupcakes


I had a church potluck to attend. What to bring? I had recently been given the book "What's New, Cupcake" and was set on trying one of the many great ideas in the book. The difficulty was in selecting which would be the first. I was thinking that I should go with the set of cupcakes that looked like ants (it was a picnic after all), but kept coming back to the miniature cherry pies (they also had blueberry pies, but I liked the look of the red). How cute! And pretty easy.
Bake cupcakes in silver foil cups so they look like miniature pans. They recommend using store bought frosting, but I think the consistency is too runny, so I made my own. Add a little yellow food coloring and cocoa powder to the white frosting to get the tan. Frost each with a layer to give the M&M's something to stick to. I purchased the M&M's at Michael's I believe, but I saw them later at Walmart for a lower price...ugh! Anyway, you can buy them in packages of all the same color so you don't have to pick through for all the red ones. Stick the M&M's, m side down to the frosting. I think we layered 13 or 14 on each. Then we used a basket weave tip (flat side up) and came back with a round tip (can't remember the size) to do the "crust". They were a HUGE hit!
Friday, July 22, 2011
R2D2
I was asked to do a Star Wars themed cake for 3 young boys that celebrate their birthdays together every year. Can you imagine the excitement from my husband when he heard we would be doing another "man cake?" We decided on R2D2.
 The head was formed in a Pyrex bowl and is actually made out of rice crispy treats. Cake would have probably been cheaper - hind sight. As I side note, I recently saw on a cake decorating show, where they formed something out of rice crispy treats and then covered it in melted chocolate. They then came back after it cooled and hardened and scraped it with a razor blade until it was smooth. This way, the fondant would lay really smooth. Kind of liked the idea, haven't tried it yet. Anyway, the body is a stack of 5 6" round cakes (cardboard and dowels halfway). The legs (is that what I would call those? - some Star Wars fans may be cringing at my terminology) are also rice crispy. We pressed the rice crispy treats together as hard as we could and then cut out the shape. In the past, I've always tried to shape it, but with the crisp edges I needed for the legs here it was a great idea to cut.
 The entire thing was covered in white fondant. We painted on the silver using silver luster dust and lemon extract. Then it was details, details, details! My husband had printed out a few photos that we tried to match as closely as we could. He did the math to determine the size everything needed to be. I think he turned out great!
 We placed him atop a wooden block covered in black fondant (also painted - with food coloring and lemon extract - easier than coloring white fondant black) to raise his body so that it would appear that he was supported by the legs. I believe this was the only problem we ran into while making this cake. We actually cut the block size to big, covered it in fondant and when we were ready to place the cake on top we realized that it was wrong. A relatively easy fix. The base is a piece of 1/2" thick plexi glass. My brother in law made me several different sizes and shapes - they are a very unique cake board, and absolutely perfect for this particular cake.
 It's hard to tell here, but on the back we did indentations of the panels rather than adding more fondant to this guy.
We were thrilled with our final product here! It was a lot of fun to work with my husband again on something that I enjoy doing so much.


We were thrilled with our final product here! It was a lot of fun to work with my husband again on something that I enjoy doing so much.
Thursday, July 21, 2011
Motocross Cake

As I planned out the cake, deciding I would make the cake look like three stacked tires with a bike on top, we determined we were going to build an edible motocross bike. This is insanity! My husband is an engineer, and does very well with crunching numbers. We bought a toy bike similar to the one we made and he used that to base all of the numbers. He created a template for each piece. We then cut out/shaped each piece individually. Note: It is crucial that you make pieces exact in order that they all fit together properly. Ours were close enough that we were able to make it work. We were using mostly edible glue to put everything together. It wasn't drying fast enough and some items were to heavy to be held up till dry. This is where I truly fell in love with royal icing. It all came together (eventually). We used edible markers for the details. It was for a 29th birthday, so we put that number on the bike.

I believe this was a chocolate cake with chocolate frosting. Chocolate frosting base is a must for black frosting. Much easier to go from brown to black than white to black. Three 10" cakes were stacked a little off center and carved to have a rounded look on the exterior. Then I frosted the tires and came back with a basket weave tip (using the smooth side out) to add the treads. I saved some of the chocolate frosting as is for mud around the base and the top, added some crushed graham crackers for gravel. Finally, the grass. I bought the grass tip specifically for this cake. Very much enjoyed using it.
I was very thankful to get this one out the door and to its destination. I don't think I will ever make an edible motocross bike again. But, one should never say never.

Wednesday, July 20, 2011
Another Baby Girl Shower
Some dear friends of ours, who started the adoption process around the same time as my husband and I, had gotten word that they would be welcoming a little girl to their home. The mother to be is from England, where they apparently don't throw showers. While she has been in the US for a few years, she had yet to attend one. We were so excited to throw her the best shower ever! She was going to be blogging about it, and we wanted to make sure that our friends across the pond saw a really nice shower. There was a lot of really beautiful food served at this event. I was, of course, in charge of the sweets. We decided on cookies and petits fours (a term I did not know until we were planning this shower - apparently a fancy way of saying small cake).
 I had seen a Martha Stewart episode once where she hung some cookies from a tree branch. Which inspired me to make the cookies into ornaments (before I baked them I cut a hole in each one using my smallest circle cookie cutter). I now know that it is pretty difficult to get a perfect circle cookie, let alone a few dozen of them. They were now a delicious treat that dually served as decoration. Have I mentioned I love brush embroidery? I used a Martha Stewart sugar cookie recipe. Used a thin consistency royal icing (white) to cover them. Once that was dry, I came back and piped/painted the flowers on. We wanted to keep the colors very pale, but I think these would look really pretty with some bolder colors.

 I also used a Martha Stweart petits fours recipe. Have I mentioned that I am truly inspired by that woman? The difference? I covered mine in chocolate rather than a glaze. Unfortunately, I did not know that you have to use an oil based color for chocolate. Lesson learned! The chocolate was really lumpy and caused a bit of a meltdown as I tried to cover these little guys with a smooth coat. Have I mentioned that I'm a bit of a perfectionist? I also made the little apple blossoms to go on top. They were a huge hit. Lots of work, but worth it!


Tuesday, July 19, 2011
Baby Booties
I was asked to make a small baby girl shower cake. Specifications "make it pink". This is what I came up with. Still in love with those carnations :). I made a pair of gumpaste booties to place on the top. I fell in LOVE! The cake is fairly simple (except figuring out the spacing of the corneli lace strips - Ugh!).
 Oval shaped chocolate cake with almond flavored frosting in pink. Ruffle border topped with shells and the corneli lace embellishments. This was over the top girl. Carnations and booties sparkle a little due to some white luster dust. I also used a little pink luster dust on the tips of the large carnations.


Monday, July 18, 2011
Precious Moments
I typically prefer only edible items on my cake (except the necessary structural pieces). However, I had someone ask for me to place this precious moments figurine on the of her confirmation cake. This was one of my favorite cakes to make. Rather traditional. I hadn't done a whole lot of that yet. I was able to try my hand at some fondant flowers as well as practice some of my piping.
 Cake covered in white fondant. As I said, flowers made out of fondant. I loved the little yellow ones. A simple bead piping along the base of each cake. The "stained glass" was created using gray royal icing for the outline (very annoyed that the two side windows are a little uneven) and filled with colored piping gel. I was very happy with the overall look of this.


Friday, July 15, 2011
1 Year Old Princess
I've gotten a little ahead of myself. This cake, as well as the next were created between Wilton courses 2 and 3.
 My niece was about to turn one. She is very much a princess. I ran across a 4 tier cake similar to this in a book at the library. I wish I could tell you the name of the book, but this was over a year ago now.
The crown was created ahead of time (yes, I'm aware that it is a little uneven and crooked - drove me nuts...but I didn't have the time to start over) and later painted with some metallic gold dust and lemon extract. Embellishments done in royal icing.
Top tier is gluten free. First experience with making gluten free cake, it doesn't rise as much as a standard cake. Yes, the bottom tier is not level, Ugh!
 I tinted the fondant pink and covered the cake. I then came back and painted it with pink luster dust and lemon extract. This gave it a bit of a shiny look. Final touches with royal icing. I used yellow royal icing for the gold parts, which were then covered in more gold luster dust/lemon extract. This was my first attempt at brush embroidery. It didn't quiet turn out as I had seen in the picture, but I was fairly pleased with it at the time. Coming up, is another cake with brush embroidery where I did much, much better. So, looking back, I don't care much for the flowers on this cake.
Overall, the cake was a hit.

The crown was created ahead of time (yes, I'm aware that it is a little uneven and crooked - drove me nuts...but I didn't have the time to start over) and later painted with some metallic gold dust and lemon extract. Embellishments done in royal icing.
Top tier is gluten free. First experience with making gluten free cake, it doesn't rise as much as a standard cake. Yes, the bottom tier is not level, Ugh!

Overall, the cake was a hit.
Thursday, July 14, 2011
Wilton Course #4
This was my final Wilton course. Our instructor informed us that Wilton had revamped all of their classes and that they were coming out with 4 new courses. She told us that there would be some overlap, but she encouraged us to take the four Wilton courses again, as there would be new material to learn. As supportive as my husband is, I needed to take a break from spending money on cake decorating classes and materials. I have yet to take them. I've seen the course books and don't feel like there is anything in them that I absolutely need at the time.
We learned how to do some fondant embellishments: draping, handkerchief style overlay, and ribbon garland and borders. Our instructor taught us how to make gum glue adhesive (essentially breaking up gumpaste and dissolving it into water). I still prefer the ease of a little Tylose powder in water. Some time was spent creating flowers such as daisies, carnations (my favorite!), and fantasy flowers. We talked about using fondant cut-outs as is, with overlays, and with inlays. Finally, we learned a few additional borders using fondant. Our final project was to design (or use one of the designs in the back of the book) our own cake. I came up with this. I'm not sure what I was going for. I know that this isn't what I envisioned. I'm thankful for those beautiful carnations, for without them, I would have truly hated this cake. As I worked on this, I kept asking myself, "was your intent a baby shower cake." That seems to be where I headed with it. The board was covered in an imprinted fondant, I did like the idea of spending time thinking about the overall presentation, not just the cake itself. However, it was hard for me to use up all that fondant to cover a cake board. I'm a bit frugal.

 So, I survived them. All four classes! I learned some new tricks and practiced some old. Looking back at these pictures makes me want to practice some of these techniques again. I have a wedding cake coming up in September that will be covered in flowers. I'll definitely be revisiting some of the things I learned in these classes.
We learned how to do some fondant embellishments: draping, handkerchief style overlay, and ribbon garland and borders. Our instructor taught us how to make gum glue adhesive (essentially breaking up gumpaste and dissolving it into water). I still prefer the ease of a little Tylose powder in water. Some time was spent creating flowers such as daisies, carnations (my favorite!), and fantasy flowers. We talked about using fondant cut-outs as is, with overlays, and with inlays. Finally, we learned a few additional borders using fondant. Our final project was to design (or use one of the designs in the back of the book) our own cake. I came up with this. I'm not sure what I was going for. I know that this isn't what I envisioned. I'm thankful for those beautiful carnations, for without them, I would have truly hated this cake. As I worked on this, I kept asking myself, "was your intent a baby shower cake." That seems to be where I headed with it. The board was covered in an imprinted fondant, I did like the idea of spending time thinking about the overall presentation, not just the cake itself. However, it was hard for me to use up all that fondant to cover a cake board. I'm a bit frugal.


Wednesday, July 13, 2011
Wilton Course #3
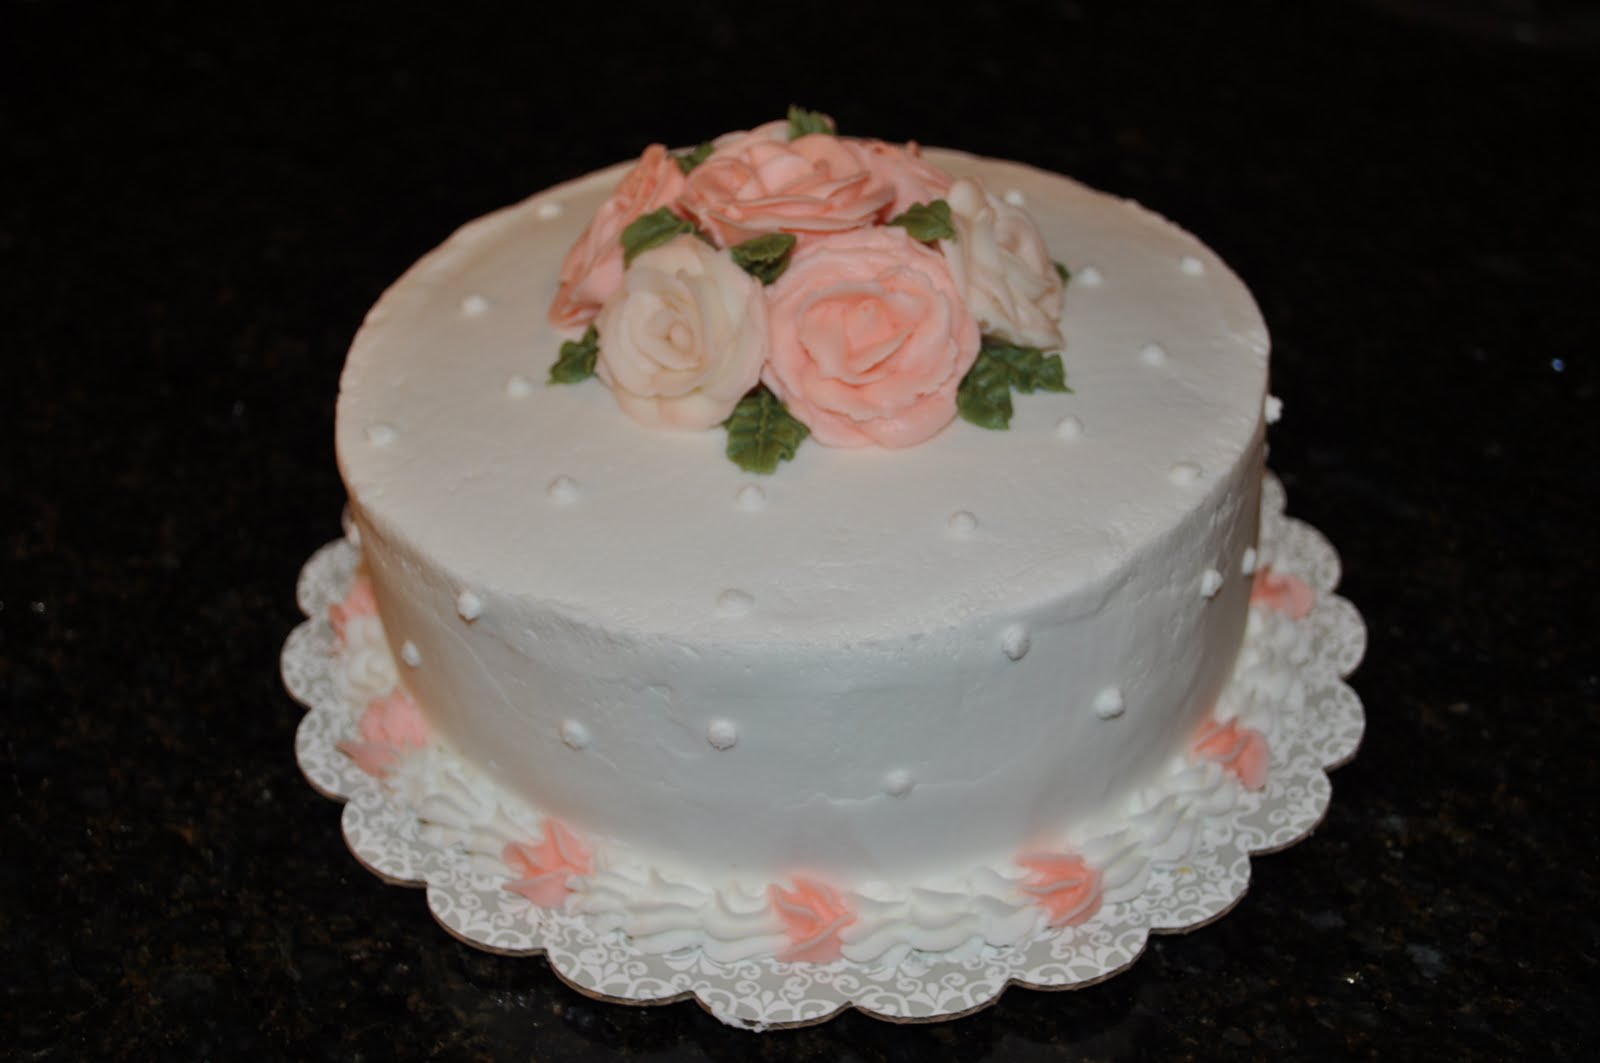
In course #3 we worked on a little bit of stringwork and borders, cornelli lace and brush embroidery (which I LOVE! - cakes coming with some of that). We also started working with fondant. I had my first truly successful experience with covering a cake with fondant in this class. Almost flawless cover. I was so happy. This alone, made the course worth while. So what did I do different. First of all, the fondant was white (less likely to crack) and I rolled it thicker (close to 1/4"). It worked out perfectly!
 We also learned to make fondant roses. I prefer this much to butter cream roses. However, they take much longer to make. We spent some more time making royal icing flowers. This time, using the lily nail. And talked about tiered construction of a cake. We finished with this beautiful wedding cake, which I sold to my mom for $20.00, our instructor told us it would sell for 250.00-400.00 due to all the hand made roses. I just wanted the materials covered and I didn't want to eat all of that cake! I was very happy with the final result.


Tuesday, July 12, 2011
Wilton Course #2
 I was only going to take one class. After all, I only had one gift card. However, the last night of class I 'accidentally' signed up for course #2. Fortunately, I have a very encouraging husband!
 We only made one cake for this course during the final week. And I actually missed the last week of class, so I made mine a few weeks later for Easter.
We spent the entire class learning how to make and work with royal icing. All of the flowers on this cake were made out of royal icing. The dry nicely, and keep well in a plastic container for months (I hear - I've never tried). I have a wedding cake coming up in September that I plan on making flowers for months in advance. I'll have to brush up on my mum making skills (my least favorite flower to make). Just as I said in my last post about butter cream frosting, royal icing consistency is SO important when it comes to making flowers. Finally, the blue birds were made out of color flow, which is very similar to royal icing, only dries a bit shinier.
Monday, July 11, 2011
Wilton Course #1
I had been decorating cakes for a few months and had been eying the Wilton courses every time I went to Michael's to get some supplies. I saw an advertisement that classes were half off and had been given a gift card. My husband finally convinced me to call and sign up. I didn't learn a whole lot, but it was fun to get some new supplies (the classes cost a lot more than they lead on when you consider all of the supplies you need to buy). I really LOVE to learn new things, so it was fun to take a class to help me in my newest hobby. For the first course I had to make 3 cakes.

Cake #1
I learned about baking a cake, leveling and splitting it to fill. I also learned how to transfer a template onto a cake and some piping skills. Pretty boring in comparison to what I had been doing. But, skills that I needed none-the-less. I was able to purchase many new tools...I mean I had to :).

Cake #2
This was actually supposed to be a clown cake. The ones where you make a 3-D clown out of frosting, and place a plastic clown head on top. I, however, refused to buy the silly clown heads as I argued I would never use them again. I'm pretty sure the instructor was a little annoyed, and now that I've got it down in print, I'll probably end up doing a clown cake.


Cake #3
The Wilton rose! We worked on these bad boys every week of the 4 week course. I haven't really done any since, so I can't say that I would be very good at it. I learned that consistency of the frosting is very important. This is not only the case with roses, but also frosting a cake. Each task in piping may take a different consistency, and knowing this as well as practicing it comes with experience.

Notice that my frosting job is not very smooth. This is extremely frustrating to me. I'm still not very good at it. This is probably my reasoning for my fondant preference.

Cake #1
I learned about baking a cake, leveling and splitting it to fill. I also learned how to transfer a template onto a cake and some piping skills. Pretty boring in comparison to what I had been doing. But, skills that I needed none-the-less. I was able to purchase many new tools...I mean I had to :).

Cake #2
This was actually supposed to be a clown cake. The ones where you make a 3-D clown out of frosting, and place a plastic clown head on top. I, however, refused to buy the silly clown heads as I argued I would never use them again. I'm pretty sure the instructor was a little annoyed, and now that I've got it down in print, I'll probably end up doing a clown cake.

Cake #3
The Wilton rose! We worked on these bad boys every week of the 4 week course. I haven't really done any since, so I can't say that I would be very good at it. I learned that consistency of the frosting is very important. This is not only the case with roses, but also frosting a cake. Each task in piping may take a different consistency, and knowing this as well as practicing it comes with experience.

Notice that my frosting job is not very smooth. This is extremely frustrating to me. I'm still not very good at it. This is probably my reasoning for my fondant preference.
Friday, July 8, 2011
Not so rubber ducky
I was helping to plan a baby shower for a friend. I saw this cake and tried convincing her that she should have a baby clothes theme. However, she wanted ducks. Which are cute too. So, as always, I went to google images ...there are a lot of cheesy cakes. I decided on a bucket full of water with a few ducks inside. This seemed like it would be a relatively easy cake. And, quite honestly, it wasn't bad at all.
A few days ahead of time I made the ducks (I prefer everything on my cakes to be edible) even though my husband recommended I just buy a few plastic ducks. The large duck was made out of rice crispy treats covered in fondant. The little guy is all fondant. I also rolled and cut out the 'wooden boards'. I colored my fondant tan first. After each strip was cut I added some texture with some of my fondant and gumpaste tools. Once it had a chance to dry a bit, I painted each with some gel food coloring/lemon extract. Then let them dry a bit more. I also made many little white balls to be used as bubbles.
I stacked to 8 x 3" round cakes with cardboard in between. Covered it in blue frosting. My husband helped hold up the 'wood' strips while I laid the gray strips around the entirety. I had to double them up as the first layer kept cracking as the 'wood' strips didn't want to stay as tight against the cake as I wanted them to. I laid the ducks into place. I used royal icing to place the bubbles and then painted them with a little shimmer dust.
 |
| Adding the finishing touches. |


Thursday, July 7, 2011
Mission: North Carolina Cake
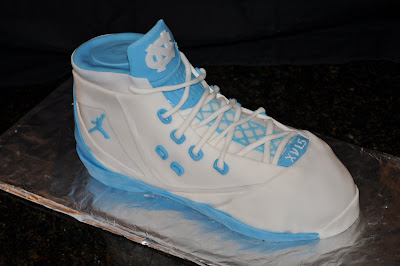
One of my closest friends was putting together a surprise 30th birthday party for her husband. I had developed a 'taste for cakes' and asked if I could make one. I was originally thinking of doing frosting stars on a 9 x 13 cake of the NC logo. I googled NC cakes and my brain started working ahead of my capabilities. Toward the end of my search I ran across this shoe. And I thought, I'll make a cake that looks like that shoe!
 First I baked two 9 x 13 chocolate cakes. I cut out the general shape of the sole out of the two cakes and stacked them with vanilla frosting in between. I then took the pieces I had left to piece together the high top portion of the shoe. Then I covered it in plastic wrap and stuck it in the freezer. After a bit of time to chill solid I began to carve it. Lesson here, always carve it smaller than you would like the final product. Finishing with the frosting and fondant adds more than one might think. Exaggerate your carving! I then gave the whole thing a crumb coat. There is one dowel in this cake down the highest part of the cake. Another lesson, always trim the dowel shorter if the cake has been in the freezer. It settled as it thawed.
 We made templates out of parchment paper for the individual pieces of fondant to be pieced together like the shoe. When I say "we" I mean my husband and I. There was no way I was going to get this cake done all by myself in the time I had. I had to bring in reinforcements :).
 My favorite part of these cakes is the details. The logos, the fact that the shoe laces actually go into the holes, and the "stitching".
 We finished this cake and walked out the door to make it to the surprise birthday on time. As soon as the guest of honor arrived we lit the candles, he blew them out, and his wife (my dear friend) asked if I would cut it. Now, I love making cakes, and the best part is that you can eat them. I have no problem cutting into one of these beauties. However, I had literally just finished making this cake. I wasn't about to cut it.
 I watched them do it instead :).
Last lesson from this particular cake. The board that one presents the cake on is just as important as the cake itself. This cake would have looked great on a board covered in fondant to look like a wood floor (like a basketball court).


Last lesson from this particular cake. The board that one presents the cake on is just as important as the cake itself. This cake would have looked great on a board covered in fondant to look like a wood floor (like a basketball court).
Subscribe to:
Posts (Atom)