Tuesday I made many batches of frosting. Four batches of almond flavored frosting, two batches of chocolate ganache, four batches of almond flavored pink frosting, and four batches of chocolate frosting. Yikes!
Wednesday I baked 8 dozen cupcakes. The bride and groom order 6 dozen, but one of the batches fell, and I was not happy with delivering them...so I made another batch.
I also cut (or attempted to hack at) the frozen cakes. I measured and cut and used my square and level (that is right, I have a square level in my cake decorating stuff) to try and get the most perfect squares I could. The bottom cake was a 12 x 12 yellow cake. I layered it with the almond frosting. I like 4 layers of cake with frosting between each layer. I'm not a huge fan of the taste of fondant. So when I cover a cake in fondant, I usually add more frosting to the inside assuming that others don't eat the fondant either. The middle cake was and 8 x 8 chocolate cake layered with chocolate ganache. The top tier was a 4 x 4 yellow cake with almond frosting. It is difficult to work with such a small cake, it just wants to move around on you, as there is so little weight.
Thursday I covered the cakes in fondant. I was really nervous about this step. I wanted to get a really crisp edges. So I decided to buy an extra fondant smoother. This really seemed to work. By using both smoothers and meeting them together on the corners I was able to accomplish a much more square edge than I have before. The difficulty, again, came with the small 4 x 4 cake. The little thing didn't hold well to the work I had to do. It turned out okay, but if there was a part of the cake I would do over...this would be it.
Then, the fun part - we put it all together! We stacked the three tiers. I added some lines to the fondant so it would appear there were separate blocks. We also glued each knob on with royal icing.
Another late night...
off to bed, have cupcakes to decorate in the morning.
Stay tuned for the final lego post...
I started decorating cakes in 2009 and have posted my creations on facebook. Many have expressed the desire to share the photos with others. While my intent is to share my cakes, this will most likely become a place for me to share many of my favorite things.
Friday, September 14, 2012
Thursday, September 13, 2012
Lego - Part 1
If you look back to the previous post, you will see that in order to get my most recent project done on time, I had created a plan. Over the weekend, prior to the completion date, I had to complete the following: Make chocolate lego bricks, create lego knobs, mix fondant colors for cakes, and make the cakes and freeze them.
We searched and searched for the perfect chocolate mold for the right size lego bricks. We ended up going with this lego mold, which made the bricks still a little bigger than an actual lego, but pretty close. Besides, who was going to complain about a little more chocolate? It was also a bit of a challenge finding the right color chocolate. We ended up ordering Mercken's brand, and it was most definitely hot pink. Not exactly the color that the bride had asked me to match, so I had to mellow it out a bit with some red candy melts that I already had on hand. I made bricks in both pink and brown. The mold makes a 2 x 4 brick, but they seemed a little big for on top of a cupcake, so I cut each in half. The edges that I had cut were not perfect, but I figured that would be the side I would stick into the frosting. The key to making these was to really pound the mold with chocolate for quite a while in order to get all the air bubbles out, especially to get nice clean knobs on the lego bricks.
So, how to make lego knobs for the cake? I had my husband convert the size of an actual lego knob on an actual lego to our cake size legos (4" x 4"). I made a pan of rice crispy bars to the proper thickness and then cut each knob out with a 1 1/2" cookie cutter. To get nice crisp edges it is best to wash the cookie cutter frequently.
After cut, I covered each rice crispy treat with chocolate. It helps to have a smoother surface to apply fondant to. Without it, the fondant takes on the shape of a rice crispy...bumpy. After applying chocolate cut off any edges that are not smooth with a knife and they are ready to go.
Next, I covered each rice crispy treat with fondant. Look at that! Beautiful! I was really worried about this, I thought I might end up with big creases, but it covered so easily. Time consuming, but easily. I rolled out the fondant quite thin and used a bigger size cookie cutter to cut it out. Then I smoothed it out. I used a little piping gel between the treat and fondant as glue.
The final step was to pipe the word "LEGO" on each of these little guys. I guess I didn't get a picture. I'm sure it was getting late, and I just wanted to be done. Again, my husband created a template (he's so good at that sort of thing) with the word "LEGO" as it appears on the actual knobs on the actual brick. We placed the template on each knob and used a pin to mark where I would need to pipe.
Oh, I also baked 2 yellow 1/2 sheet cakes and 2 chocolate 9 x 13 cakes. I read somewhere that it is best to freeze a cake in order to get nice crisp cuts. I wanted as sharp of an edge on the lego bricks as possible, so I planned to freeze them. Just in case I forget to mention it later, it was far too difficult to cut through the frozen cake. I will not freeze a cake to cut it again. Maybe if you are sculpting? I'm not sure.
Stay tuned for the next steps...
Wednesday, September 12, 2012
Legos
Many, many months ago...I agreed to do a lego themed cake and cupcakes for a friend's wedding. This cake was a bit more of a challenge as their was a lot to do (a 3 tier cake and 72 cupcakes) and I had an additional child to take care of. Turns out, a break from cakes may be in the best interest of my family and my sanity :). I decided if I was going to pull this off, I needed a good plan of attack.
The Plan
The weekend prior to the cakes due date:
-Make the chocolate lego bricks
-Make the lego knobs
-Mix fondant colors for covering cakes
-Make the cakes and freeze them (I will talk more about this later)
Tuesday:
-Make frosting
Wednesday:
-Bake cupcakes
-Frost Cakes
Thursday:
-Cover cakes with fondant
-Ad detail work to cakes
Friday:
-Frost cupcakes
-Deliver
When my friend came to me, she brought a stack of lego bricks in the shape of a three tier wedding cake, she wanted the cake to look like that...only bigger. Her colors were pink and brown, so the cake was to coordinate. As always, I started by taking many pictures of the process, but as I got involved...I picked up the camera less and less. Stay tuned to see how well I stuck to the plan and how it all turned out.
The Plan
The weekend prior to the cakes due date:
-Make the chocolate lego bricks
-Make the lego knobs
-Mix fondant colors for covering cakes
-Make the cakes and freeze them (I will talk more about this later)
Tuesday:
-Make frosting
Wednesday:
-Bake cupcakes
-Frost Cakes
Thursday:
-Cover cakes with fondant
-Ad detail work to cakes
Friday:
-Frost cupcakes
-Deliver
When my friend came to me, she brought a stack of lego bricks in the shape of a three tier wedding cake, she wanted the cake to look like that...only bigger. Her colors were pink and brown, so the cake was to coordinate. As always, I started by taking many pictures of the process, but as I got involved...I picked up the camera less and less. Stay tuned to see how well I stuck to the plan and how it all turned out.
Tuesday, September 11, 2012
A taste of summer
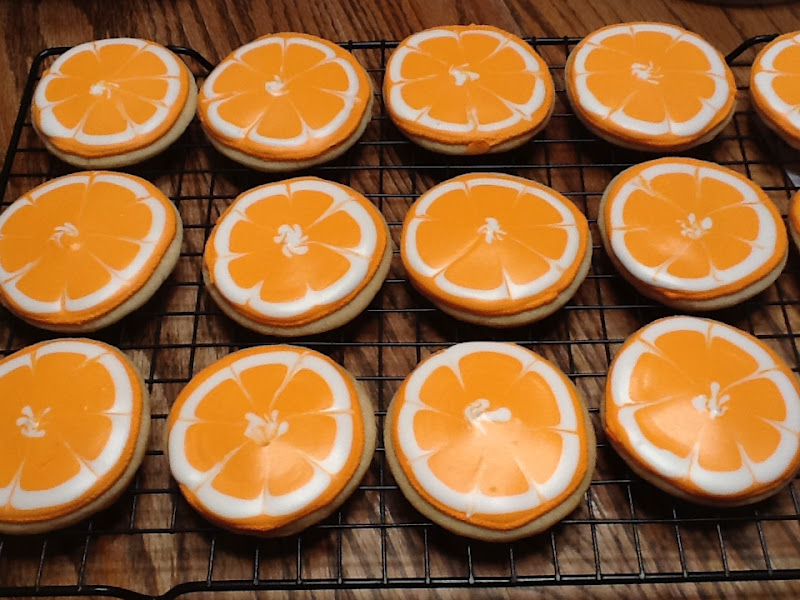
Another adoption fundraising bake/garage sale. Our good friends Aaron and Kristy have decided to begin the process of adoption to add to their already beautiful family of three. Last minute, I decided to do some cookies...I actually started these at about 5:00 in the evening and finished them around 12:00 am. I wouldn't recommend it :). I saw a tutorial for these cookies a few months ago, and this seemed like the perfect opportunity to give them a try. You don't really need a step by step, as the tutorial is done very thoroughly, but here are some pictures for you.
I tried a new royal icing. I looked up one that included lemon juice. I thought it might be nice if these citrus looking cookies had a taste to go along with it. I was unhappy with the way the icing turned out. It didn't spread like I prefer and it never really hardened completely. It was very airy...I'm sure there is a place for this texture of royal icing, but it is not in decorating cookies.
I also noticed that the final look of the royal icing was more matte than I would prefer. Especially for a cookie that should look like a juicy orange.
None the less, I packaged half of these little guys up. I was able to take half to the bake/garage sale, and half to a class reunion. I even had leftover for a birthday party the following day!
Sunday, August 12, 2012
Owl Cookies
It has been a while since I've posted anything. The main reason is the new love in my life!
| Click on the picture to read more about our adoption story. |
We welcomed Titus to our family over two months ago. Isn't he just the cutest thing you've ever seen? He's grown a lot in the last few months. It has been a blur of pure joy.
You may recall in my last post we were hosting a garage sale for some close friends of ours who were raising funds to adopt. Not long after we brought Titus home, they too were blessed with an addition to their family. I had to take a break from my maternity leave to provide some cookies for her baby shower for two reasons: 1) I am so excited for them. 2) I love owls, and her nursery is owl themed. The below decal is on the wall in their little one's
nursery.
With my inspiration, I was off. I used a 3 1/2 inch round cookie cutter. Decorated with royal icing, I tried to implement different parts of the decal. My favorite were the little owls. This picture was taken before I got the cute little flowers on the owls heads. They were even cuter after.
| Congratulations to Talley and Sarah and their precious little daughter! |
Thursday, May 24, 2012
More Cookies
![]() |
| Click on image to make larger. |
Sunday, May 6, 2012
Rhino Cake
A technique I have wanted to try for over a year now is called frozen buttercream transfer. I was given the opportunity to give it a try this week. A friend was turning forty, and he LOVES rhinos. While I initially envisioned a 3-dimensional rhino busting through the front of a cake, my husband reminded me that we did not have the time this week to take on that particular cake (make note of this for a future date). Instead I chose a logo (blue rhino marketing) off the web and used this tutorial to accomplish this fun cake. It was still pretty time consuming, but fairly simple and not stressful at all.
This is four layers of chocolate cake with chocolate ganache between each layer (my friend is a huge fan of chocolate). I used American vanilla buttercream for the logo and the exterior. Crumb coat is a must when covering a chocolate cake with white frosting. I was pleased with my final coat of buttercream...pretty smooth. I used a hot offset spatula to accomplish this (dip your spatula in really hot water, wipe it clean, and use it to smooth your cake, it melts the buttercream a little for a smooth surface). Follow behind with a viva paper towel to smooth out any bumps. Not too shabby! There was a bit of bleeding between the white and black as the transfer thawed. I used Wilton food coloring, and I've heard some other brands are better for eliminating this problem. Speaking of black frosting, I add cocoa powder to my vanilla frosting first (making it brown) before adding the black food coloring. It is a lot easier going from brown to black than white to black.
Subscribe to:
Posts (Atom)